Categories
General Travel Gear & Resources

Why I Wire My Money via Transferwise

What is Transferwise

Transferwise is an innovating resource that allows for ease and time efficient money transfers from one bank account to another, domestic or international. Founded in London in 2010, over the course of the past decade, it has grown to become one of the leading money transfer tools of the time.

When & How Many Times I’ve Used Transferwise

From personal experience, I have so far only transferred money four times. But enough to love and trust this service.

  • NZD to Euros, once
  • NZD to AUD, once
  • NZD to USD, twice

(Note: My visa ended in New Zealand and needed to get my money home somehow 😀 )

First things first: Is it safe?

This was the initial question that held me back the first time I needed a transfer and it cost me 140USD doing a bank to bank wire transfer when it could have cost me maybe 10USD. Transferwise is a highly reputable company backed by many large named investors such as one of the founders of Paypal. It’s legit!!!

How it Works

Credit: Wikipedia

Lets say you are a Canadian planning to live about a year in the U.K.. You obviously have a Canadian bank and plan to open a British one. You have your British bank set up but want to have starter funds from home before you start working let’s say (Or you want to buy a car and would be easier to pay with funds in a British account). You send money from the Canadian to Transferwise’s designated temporary bank account for holding. Once Transferwise receives these funds, they will send those funds off to the bank in the U.K..

That’s it!

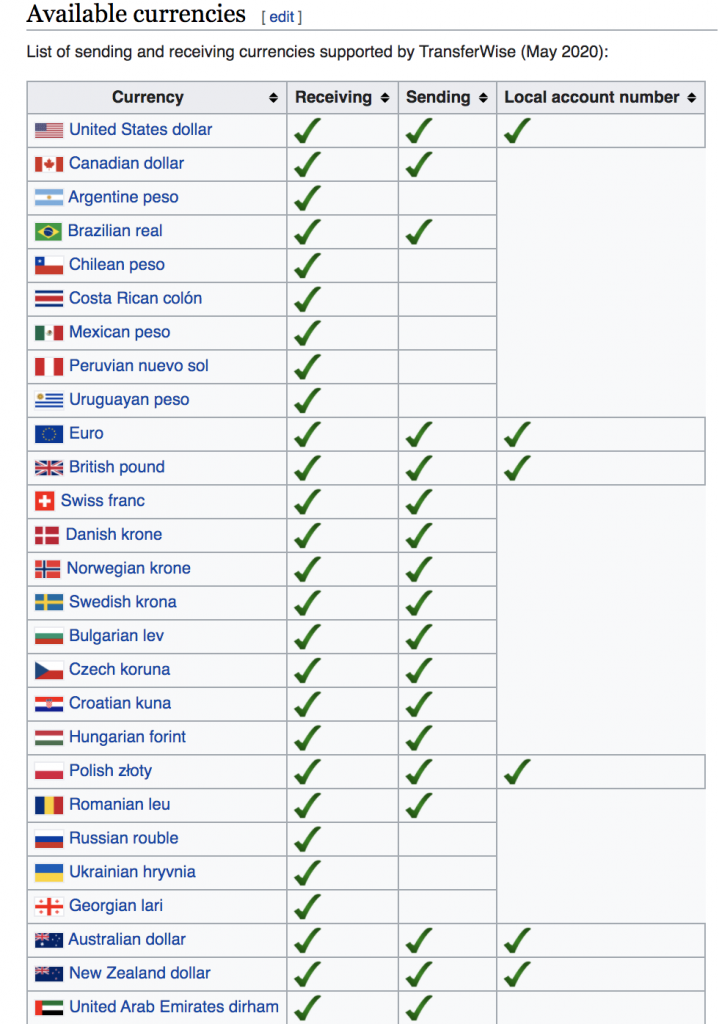
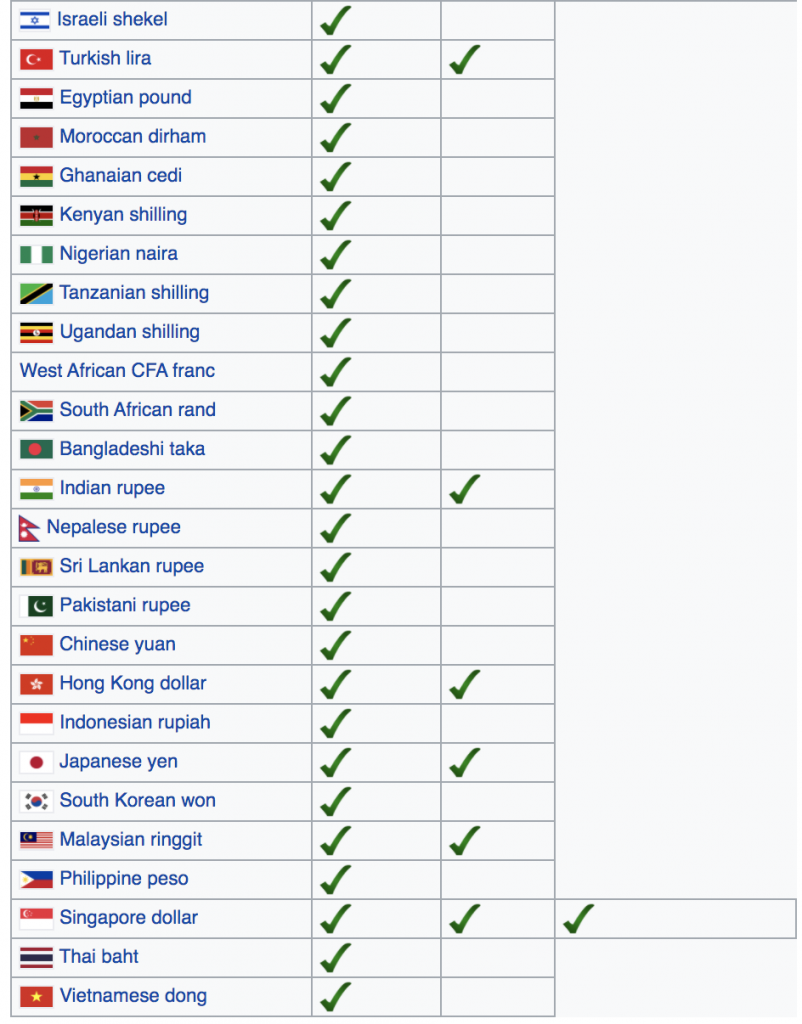
Currencies Available to Send/Receive

Screenshot of Currencies available (May 2020)

Fee’s and Costs

I cannot simply write what the fees are as they vary but I’ll just say that it’s affordable to use Transferwise in comparison to a bank to bank wire transfer which can be very expensive. In fact I believe it is the cheapest option (Correct me if I am wrong but I am confident on that). Costs are dependent on where you are sending from and where the money is going. Also depends on how you are sending:

  • Bank Debit (ACH) – What I’ve Used
  • Wire Transfer
  • Debit Card
  • Credit Card
Inputing amount I wanted to send with breakdown of everything.
Example of fees depending on how you send the money and it’s delivery date.

Note: Before I started using Transferwise, I transferred 2,000 USD to NZ via Bank to Bank wire transfer and cost me $150 USD in fees. I eventually transferred three times more of this back from New Zealand to US and only cost me around $22 USD. INSANE!!!!

(Note 2.0: Xoom is another money transfer service that seems to not have fees. The thing is, Paypal is a rough credibility with scams. Call me biased, but no thanks)

How long it takes?

Time to transfer money can be quick and easy but individual bank institutions can be responsible for longer durations. With that being said, the times I’ve used Transferwise, it took approximately 2-3 days from bank A to bank B. New Zealand to Australia took 2 days to no surprise. And the two from New Zealand to the US took 3 days on one transfer and 5 on the other I think because of the time of day I had sent it.

(Personal Note: The transfer to Euros didn’t matter. As long as the money was sent from me to the captain of the sailboat I was on for 19 days. Had to pay for my usage and stay somehow 🙂 )

Why I Use It

I am a world nomad, and if anything has been the most complicated in my travels, it’s getting my money sorted from border to border. Having lived in New Zealand temporarily and with intentions on living in far flung places whether for a few months to over a year, I now have no fear of having to deal with hurdles and high fees just to have my money. With that being said, Transferwise has become my number one go to platform and resource to get my money from home away from home to…my home home :). It’s fast, cost efficient, reliable, easy to use, and best of all, it’s safe.

If you’re interested in trying out Transferwise, click the image below. This is an affiliate link and any services used through this link will support me in every way.

Categories
Travel Gear & Resources

How I Camp & What I Carry | Solo Backpacking

I have been traveling on and off for four years now and couldn’t stress the importance of having camping gear with me, ALWAYS. The freedom and the knowing of that freedom along the way in whatever voyage you’re on is such a big deal. Whether you’re picking a spot in the woods, selecting a sweet campsite, or even couchsurfing when there is no couch (or bed) & sleeping pad comes in handy. My first extensive trip was to Europe for six months and had done-so without camping gear. And that was a big regret!! When I returned home to regroup myself for an even longer voyage, one that would involve traveling across the USofA, California, Hawai’i, New Zealand, & the Pacific Islands, I made it priority to get myself some camping gear, to enjoy true freedom.

Beach campout: Uoleva, Tonga

Here is what I have & the some of experiences I’ve had along the way.

My Tent

First test setup in front of my house.

If I was backpacking solo 99% of the time, that meant I had to be prepared to camp solo. What was most important to me if I was carrying around a tent on my back, was something lightweight to carry and packed well enough to manage on the go. This is where I discovered the ALPS Mountaineering Lynx 1-Person Tent, a cost efficient, light weight, compact, yet spacious single person tent that managed well in my style of solo backpacking. I’ve pitched this tent everywhere from National Parks, backyards, on the beach, in the woods, near a cliff. And in brutal cold, insane heat, fairly heavy rain, and moderate wind as far as climate goes. I’ve even latched this tent on a motorcycle during my time in New Zealand. (Check out some of the experiences below)

Camped out on Lake Wanaka, New Zealand
Campground with my motorcycle in Haast Pass, New Zealand.

How long does it take to set up? Patiently, it takes me about 15 minutes but in a rush to beat sundown, 10 minutes. The set up is as easy as it gets as you layout your tent and hoist it up with two flexible aluminum poles. The poles work in a way that gravity will even allow them to connect together, it’s amazing. Once set up, you have the option of putting up the rain fly, either for rain, wind, or even sunlight if camping in shade isn’t an option. When at first I was nervous about rain coming in, the rainfly has never let me down, NEVER.

As far as space goes, I am 5 foot 5 and slim and fit comfortably inside the tent from head to toe. I have enough space by with to lay on my stomach with my leg bend outward. The vestibule to no surprise is extremely small and is only large enough to set out your footwear and a few things you dont mind getting wet should it rain. Because I have nowhere else to put my rucksack, it in fact goes inside my tent with me and I still have the ability to sleep comfortably with the bag next to my legs. Height is only tall enough to sit up in the center of the tent to look out the front of the tent otherwise just lay down or get out.

The inside of the tent with my rucksack also inside with me.
Tent when fully packed up.

Sleeping Bag

I use an Outdoorsman Lab Sleeping Bag which was given to me as a gift before my long extensive trip. Carrying around a sleeping bag comes with it’s cons as it’s size takes up alot of space on the outside, but it’s absolutely necessary in those cold climates, hell, even on cool nights it provides comfort. This sleeping bag has served me well in nearly every camping trip I’ve ever had.

Sleeping bag when fully packed up.

Sleeping Mat

My first sleeping pad I used for years was the Kelty PDa Trailogic Sleeping Pad. I loved this thing as it was so comfortable and enjoyed setting the comfort by simply releasing some air. Unfortunately it met it’s demise after so much use as a number of holes popped up everywhere where my upper body would be and despite numerous attemtps at fixing, I just gave up. It’s no long sold anymore and even so, I didn’t want to deal with this happening again and sleeping on the floor before I could get another pad.

Credit: Tree Line Backpacker

This is what led me to buy the Z-Lite Sol closed cell pad. I have yet to attach this to my backpack and haven’t traveled with it yet, but I can vouch for the comfort and simplicity. And happy to know that I won’t be out in the woods somewhere and find myself deflated to the floor. 🙂

Z lite sol sleeping mat pad
Credit: Thermarest

Pillow

Near my home in South Carolina is an REI store where I have picked up a number of supplies for my travels. Once of these was the very pillow where I rest my head. I carry an inflatable Cocoon AIR CORE Hood/Camp Pillow and is really easy to inflate and deflate. I’ve never found discomfort in using this pillow as I’ve always found the proper inflation to my liking to sleep comfortably.

Credit: REI

Hammock

All necesities have to at least come with one pleasure or reward. Whats a big dinner without desert. My camping treat, is my Eno Sub7 Hammock and has been the best last minute 80 dollar investment before I set off for world travel. (Caribiners were bought seperate). If there is anything I love the most in my travels other than beautiful spots and cultural connections, it’s my damn hammock. Nothing beats finding two perfect trees just wide enough apart to set up a hammock and simply relax. Especially after a long day on the road, why wouldn’t you want to kick back in one of these. Eno has a variety of hammocks that range from comfort, size for multiple people, or for lightweight and size best suited for me. The con of this hammock is that it is not comfortable enough to have a proper nights sleep. That’s not to say that I haven’t fallen asleep in it. And should you want to lay with a partner or friend, you can’t. It’s only for one person! Please, just please…I only ask you to do one thing if you are a solo traveler and camper, get this hammock…you wont regret it!

Shakas on O’ahu, Hawai’i

All in all, I can’t see my travel without having any of these things now. It’s like when I discovered hitchhiking, once I started, I could never stop. That was because I didn’t have the need to be so reliant on buses, trains, and rideshares anymore, the road was the limit. Camping allows that endless freedom of being able to pick your own place for the night, or week. And of course comes at a major discount compared to a hotel or airbnb and minus the noise in a hostel.

Lake Okaro, New Zealand

If you came here because you were looking to get yourself some camping gear for the road and have some questions, please comment below or send me a message on the contact me page.

AFFILIATE LINKS: The links provided in this blog are links to the equipment I use in my travels and will earn me commission should you decide to buy any of these. All purchases help support my content in every way and hopefully, support you in your travels as well. 🙂